
How to send Spark dataframe values as HTML table to Email?
Spark dataframe
Spark dataframe is a distributed collection of rows with the same schema. The schema defines the structure of the Dataframe such as column name and an associated type. Spark dataframe is equivalent to a table in a relational database or a dataframe in R/Python. Dataframe is available for general-purpose programming languages such as Java, Python, and Scala.
The Dataframe API was released as an abstraction on top of the RDD, followed by the Dataset API. The dataframe can be constructed from different sources such as Hive tables, external databases (example. Oracle,Mysql), structured data files or from existing RDD’s.
Write Pyspark program to send Spark dataframe as HTML table in Email
Step 1 : Create dataframe from Hive table
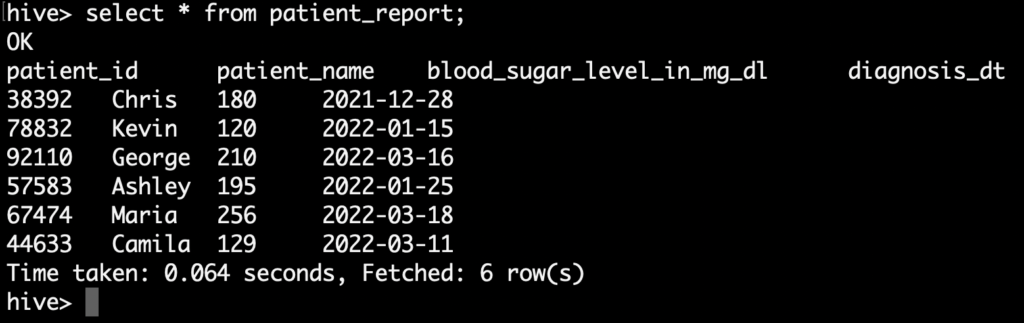
In this example, we are going to create a Spark dataframe by reading the Hive table. Let’s consider that we have a patient_report table in Hive which has the blood sugar details of each patients.
From this table, we are going to extract the patients who has the blood sugar level more than 200 mg/dL in the month of march,2022.
Lets write a Pyspark program to read those patient details from the Hive table and create a spark dataframe.
|
1 2 3 |
fetch_sql = "select * from hospital_db.patient_report" diagnosis_res_df = spark.sql(fetch_sql) diagnosis_res_df.show() |
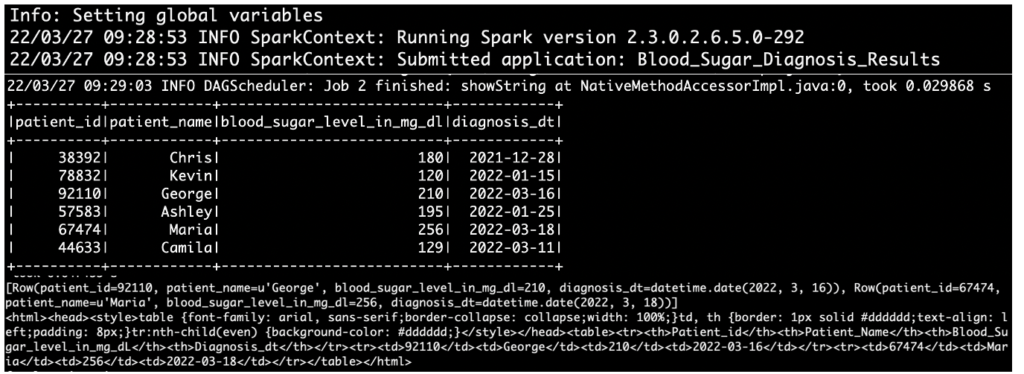
As we shown in the above program, First we are reading the patient details from Hive hospital_db.patient_report and creating a Spark dataframe as diagnosis_res_df.
Step 2 : Loop through dataframe using for loop
Next we are registering a dataframe to a temporary table with the name of diagnosis_temp_table. So that we can run a spark.sql() on this to extract the patients who has the blood sugar level more than 200 in the month of march,2022.
Also we used collect() function to retrieve data from the dataframe. Then we are iterating each element from the row and assigning each column value to a separate variable.
|
1 2 3 4 5 6 7 8 9 |
diagnosis_res_df.createOrReplaceTempTable("diagnosis_temp_table") monthly_rpt = spark.sql("select * from diagnosis_temp_table where Diagnosis_dt between '2022-03-01' and '2022-03-31' and Blood_Sugar_level_in_mg_dL >=200").collect() print(monthly_rpt) for row in monthly_rpt: patient_id = str(row["patient_id"]) patient_name = str(row["patient_name"]) blood_sugar = str(row["blood_sugar_level_in_mg_dl"]) diagnosis_dt = str(row["diagnosis_dt"]) |
Step 3 : Prepare HTML table
In the previous step, we got the required values in a separate variable. Now we need to create a HTML table with those variables. In HTML table syntax, we have to define the table header, table row and table data.
Let’s define those code in Pyspark as below. The variable body holds the header section of the HTML table with Style properties. Then the variable strTable have the table header values. Next in the for loop, we are preparing the table data that will be used in the table row.
|
1 2 3 4 5 6 7 8 9 10 11 12 |
body = "<html><head><style>table {font-family: arial, sans-serif;border-collapse: collapse;width: 100%;}td, th {border: 1px solid #dddddd;text-align: left;padding: 8px;}tr:nth-child(even) {background-color: #dddddd;}</style></head>" strTable = "<table><tr><th>Patient_id</th><th>Patient_Name</th><th>Blood_Sugar_level_in_mg_dL</th><th>Diagnosis_dt</th></tr>" strTable = body+strTable for row in monthly_rpt: patient_id = str(row["patient_id"]) patient_name = str(row["patient_name"]) blood_sugar = str(row["blood_sugar_level_in_mg_dl"]) diagnosis_dt = str(row["diagnosis_dt"]) strRW = "<tr><td>"+patient_id+ "</td><td>"+patient_name+ "</td><td>"+ blood_sugar + "</td><td>" + diagnosis_dt + "</td>" + "</tr>" strTable = strTable+strRW strTable = strTable+"</table></html>" |
Step 4 : Send email using Pyspark
Next step is sending the HTML table in email. For the email, we need to define the below inputs
- From Address – To mention the user who is sending the email
- Recipients – To mention the email address of the recipients
- CC – To mention the CC address of the recipients
- Subject – To define the subject of the email
- MIMEText – The body text of the email message. Here the body of the message is a HTML table.
Once we set all these values, we need to create a smtp object. In the smtp object ,we need to mention the mail server that will be used to send email.
|
1 2 3 4 5 6 7 8 9 10 11 12 13 14 15 16 17 18 19 20 21 22 |
fromAddr = "hospital_admin@mxc.com" recipients = "ryan_dr@mxc.com" cc = "chief_nurse@mxc.com" subject = "Diabetes Report in March,2022" # Create the root message and fill in the from,to,cc and subject headers msgRoot = MIMEMultipart('related') msgRoot['Subject'] = subject msgRoot['From'] = fromAddr msgRoot['To'] = recipients msgRoot['Cc'] = cc #Set type of MIMEText as HTML msgText = MIMEText(strTable, 'html') #Attach body of the message as HTML table msgRoot.attach(msgText) smtp = SMTP() smtp.connect('mx.bstn.mxc.com', 25) smtp.sendmail(fromAddr, recipients.split(','), msgRoot.as_string()) smtp.quit() |
Complete Pyspark program to send dataframe via email
Let’s write the complete Pyspark program by combining all the functions. The Pyspark program is saved with the name of send_blood_sugar_report.py.
|
1 2 3 4 5 6 7 8 9 10 11 12 13 14 15 16 17 18 19 20 21 22 23 24 25 26 27 28 29 30 31 32 33 34 35 36 37 38 39 40 41 42 43 44 45 46 47 48 49 50 51 52 53 54 55 56 57 58 59 60 61 62 63 64 65 66 67 68 69 70 71 72 73 74 75 76 77 78 |
from pyspark.sql import SparkSession from email.mime.multipart import MIMEMultipart from email.mime.text import MIMEText from smtplib import SMTP def NotifyInEmail(diagnosis_res_df): diagnosis_res_df.createOrReplaceTempView("diagnosis_temp_table") monthly_rpt = spark.sql("select * from diagnosis_temp_table where Diagnosis_dt between '2022-03-01' and '2022-03-31' and Blood_Sugar_level_in_mg_dL >=200") .collect() print(monthly_rpt) fromAddr = "hospital_admin@mxc.com" recipients = "ryan_dr@mxc.com" cc = "chief_nurse@mxc.com" subject = "Diabetes Report in March,2022" #Create body of the email message body = "<html><head><style>table {font-family: arial, sans-serif;border-collapse: collapse;width: 100%;}td, th {border: 1px solid #dddddd;text-align: left;padding: 8px;}tr:nth-child(even) {background-color: #dddddd;}</style></head>" footer = " <br/><br/> **This is an auto generated mail <br/><br/>" strTable = "<table><tr><th>Patient_id</th><th>Patient_Name</th><th>Blood_Sugar_level_in_mg_dL</th><th>Diagnosis_dt</th></tr>" strTable = body+strTable #Create dynamic HTML table with data for row in monthly_rpt: patient_id = str(row["patient_id"]) patient_name = str(row["patient_name"]) blood_sugar = str(row["blood_sugar_level_in_mg_dl"]) diagnosis_dt = str(row["diagnosis_dt"]) strRW = "<tr><td>"+patient_id+ "</td><td>"+patient_name+ "</td><td>"+ blood_sugar + "</td><td>" + diagnosis_dt + "</td>" + "</tr>" strTable = strTable+strRW strTable = strTable+"</table></html>" #print HTML table print(strTable) # Create the root message and fill in the from,to,cc and subject msgRoot = MIMEMultipart('related') msgRoot['Subject'] = subject msgRoot['From'] = fromAddr msgRoot['To'] = recipients msgRoot['Cc'] = cc #Set type of MIMEText as HTML msgText = MIMEText(strTable, 'html') #Attach body of the message as HTML table msgRoot.attach(msgText) #Create SMTP object to send email smtp = SMTP() #Connect specific mail server with the input of server address and its port smtp.connect('mx.bstn.mxc.com', 25) #Send email smtp.sendmail(fromAddr, recipients.split(','), msgRoot.as_string()) smtp.quit() print("Blood Sugar Report has been sent to Doctor successfully") #custom function to access Hive Table def FetchHiveTable(): fetch_sql = "select * from hospital_db.patient_report" diagnosis_res_df = spark.sql(fetch_sql) diagnosis_res_df.show() #Call next custom function NotifyInEmail() to prepare HTML table and send email NotifyInEmail(diagnosis_res_df) #Main program starts here if __name__ == "__main__": appname = "Blood_Sugar_Diagnosis_Results" #Creating Spark Session spark = SparkSession.builder.appName(appname).enableHiveSupport().getOrCreate() print("Spark application name: " + appname) #Call custom function FetchHiveTable() to generate and send blood sugar report FetchHiveTable() spark.stop() exit(0) |
Shell script to run the Pyspark program => test_script.sh
Let’s write a shell script to run this Pyspark program. In that script, we are setting the Spark environment variables. Then we are giving the spark-submit command to execute our Pyspark program send_blood_sugar_report.py.
|
1 2 3 4 5 6 7 8 9 |
#!/bin/bash echo "Info: Setting global variables" export SPARK_MAJOR_VERSION=2 export SPARK_HOME=/usr/hdp/2.6.5.0-292/spark2 export PATH=$SPARK_HOME/bin:$PATH spark-submit /x/home/user_alex/test/send_blood_sugar_report.py |
Execute the shell script to run the Pyspark program
Finally we can run the shell script test_script.sh. It will execute Pyspark program to send blood sugar report to Doctor.
|
1 |
sh test_script.sh |
Output
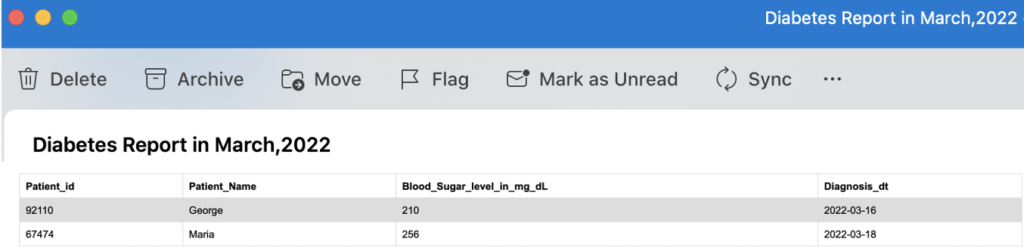
Report in email
As we shown below, the report contains the patient details who has the blood sugar level more than 200 in the month of march,2022.
Recommended Articles
- How to access a Hive table using Pyspark?
- How to write a Spark dataframe to Hive table using Pyspark?
- How to read BigQuery table using PySpark?